Karve Tales From The Shop - ep 1

You probably already know that we make every single aspect of our safety razors in our own shop. We have mills, lathes, a couple of saws, and even some machines that we built ourselves. Pretty standard fare for most manufacturers.
And we show them off whenever we can because machinery is awesome...they make things!
But quality assurance is just as equally important. We say we inspect everything, but how do we actually do that? Well, I hope to shed a bit of light on the topic by showcasing some of the different tools and techniques we use every day.
First of all, why do we need quality assurance? Can't we just set up the machine and let it run? Short answer, no. Every manufacturing process is finely tuned and always trying to go out of spec. Tool wear is a big factor, but so is machine wear, temperature swings, material changes, and the operator's actions. You can count on a process going out of spec almost like it's out to get you.
Defects happen. That’s the nature of manufacturing. So we're diligent...we measure and inspect. We do it because we want every razor to be perfect. The best way for a defective razor to end up in your hands is if we don't look for the defects. Which is unacceptable, of course. We do it so that we can assure you that the razor we sold you meets our stringent quality requirements. We do it because it's the same thing we expect when we purchase razors for ourselves.
Some things can be inspected sporadically, like the length of a rough cut piece of raw material. Other features need to be validated accurately every single time, like the thread on the underside of the top cap. If the thread isn't just right, it'll bind or feel rough. Each component of the razor has at a least a couple features that need to be inspected 100% of the time. And there are a handful of measurements we take one last time, right before shipping as a part of our final spot check. Not just for quality assurance but also to put our minds at ease, once all is said and done, before it ships out to you.
That's the why.
Now for today's example. The question came up the other day: “How can we be sure that every stand fits every razor...ever?” We have a number of inspections during the stand's manufacturing process, but there is one simple spot check we perform to each stand right before it goes into its packaging.
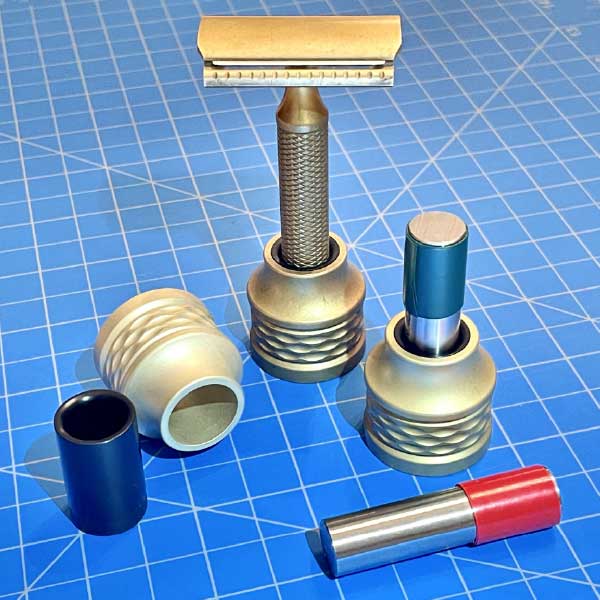
We insert a calibrated gage pin into the hole...it's the green pin inserted into the stand in the picture above. If the green pin goes in, the hole is large enough and the stand will fit every razor. We picked the green pin so that the largest possible handle always fits.
In another process, we control the outside diameter of the handle. If the handles are too large they get rejected. In this inspection, if the stands are too small, they get rejected. Between these two inspections and the rejection protocol, there's no way a razor won't fit into a stand, even a stand that we'll make years from now.
What's the red pin for? We need to set an upper limit of how large the hole can be. It would be easy to just make sure that the hole isn't too small. We could just make the hole really big. Like uncomfortably oversized. But the razor would be loose, sloppy, and leaning to the side...quite the opposite of what you expect from a quality safety razor. So, we make sure that the hole is big enough, but not too big...and the red pin is how we validate that. If the red pin doesn't fit, the hole isn't too large.
Gage pins are neat that way...two pins allow you to validate the size of a hole in seconds. If one pin fits, the hole is good. If neither pin fits, the hole is too small. If both pins fit, the hole is too big. You don't even need to look at the colors on them...just confirm that only one pin fits.
So there you have it. A simple technique we use every day to ensure quality on every stand we make, at the moment that we last touch it.
Stay tuned for more installments with some of the other quality assurance techniques we use.